9 Advanced Mah Jongg Strategies to Play Smarter & Win
Unlike basic Mah Jongg tips, advanced strategies don’t always fit neatly into one stage of gameplay. An early-game strategy in the Charleston may affect which tiles become dangerous later, while an early discard may provide the clue you need to interpret an opponent’s exposures during the last wall. Instead of treating the Charleston, hand selection, discarding, and defensive play as separate skills, advanced players combine information gathered throughout the game to guide each decision.
The nine strategies in this guide are arranged in the general order that their decisions arise, from evaluating your starting hand and navigating the Charleston to reading exposures, managing Jokers, and responding to endgame signals. Try focusing on one strategy at a time until it becomes familiar, then begin combining them. As you gain experience, information gathered early in the game will help you make stronger calling, discarding, and defensive decisions later whether you’re playing Mah Jongg online or at a table with friends.
1. Determine Which Mah Jongg Hands Are Achievable
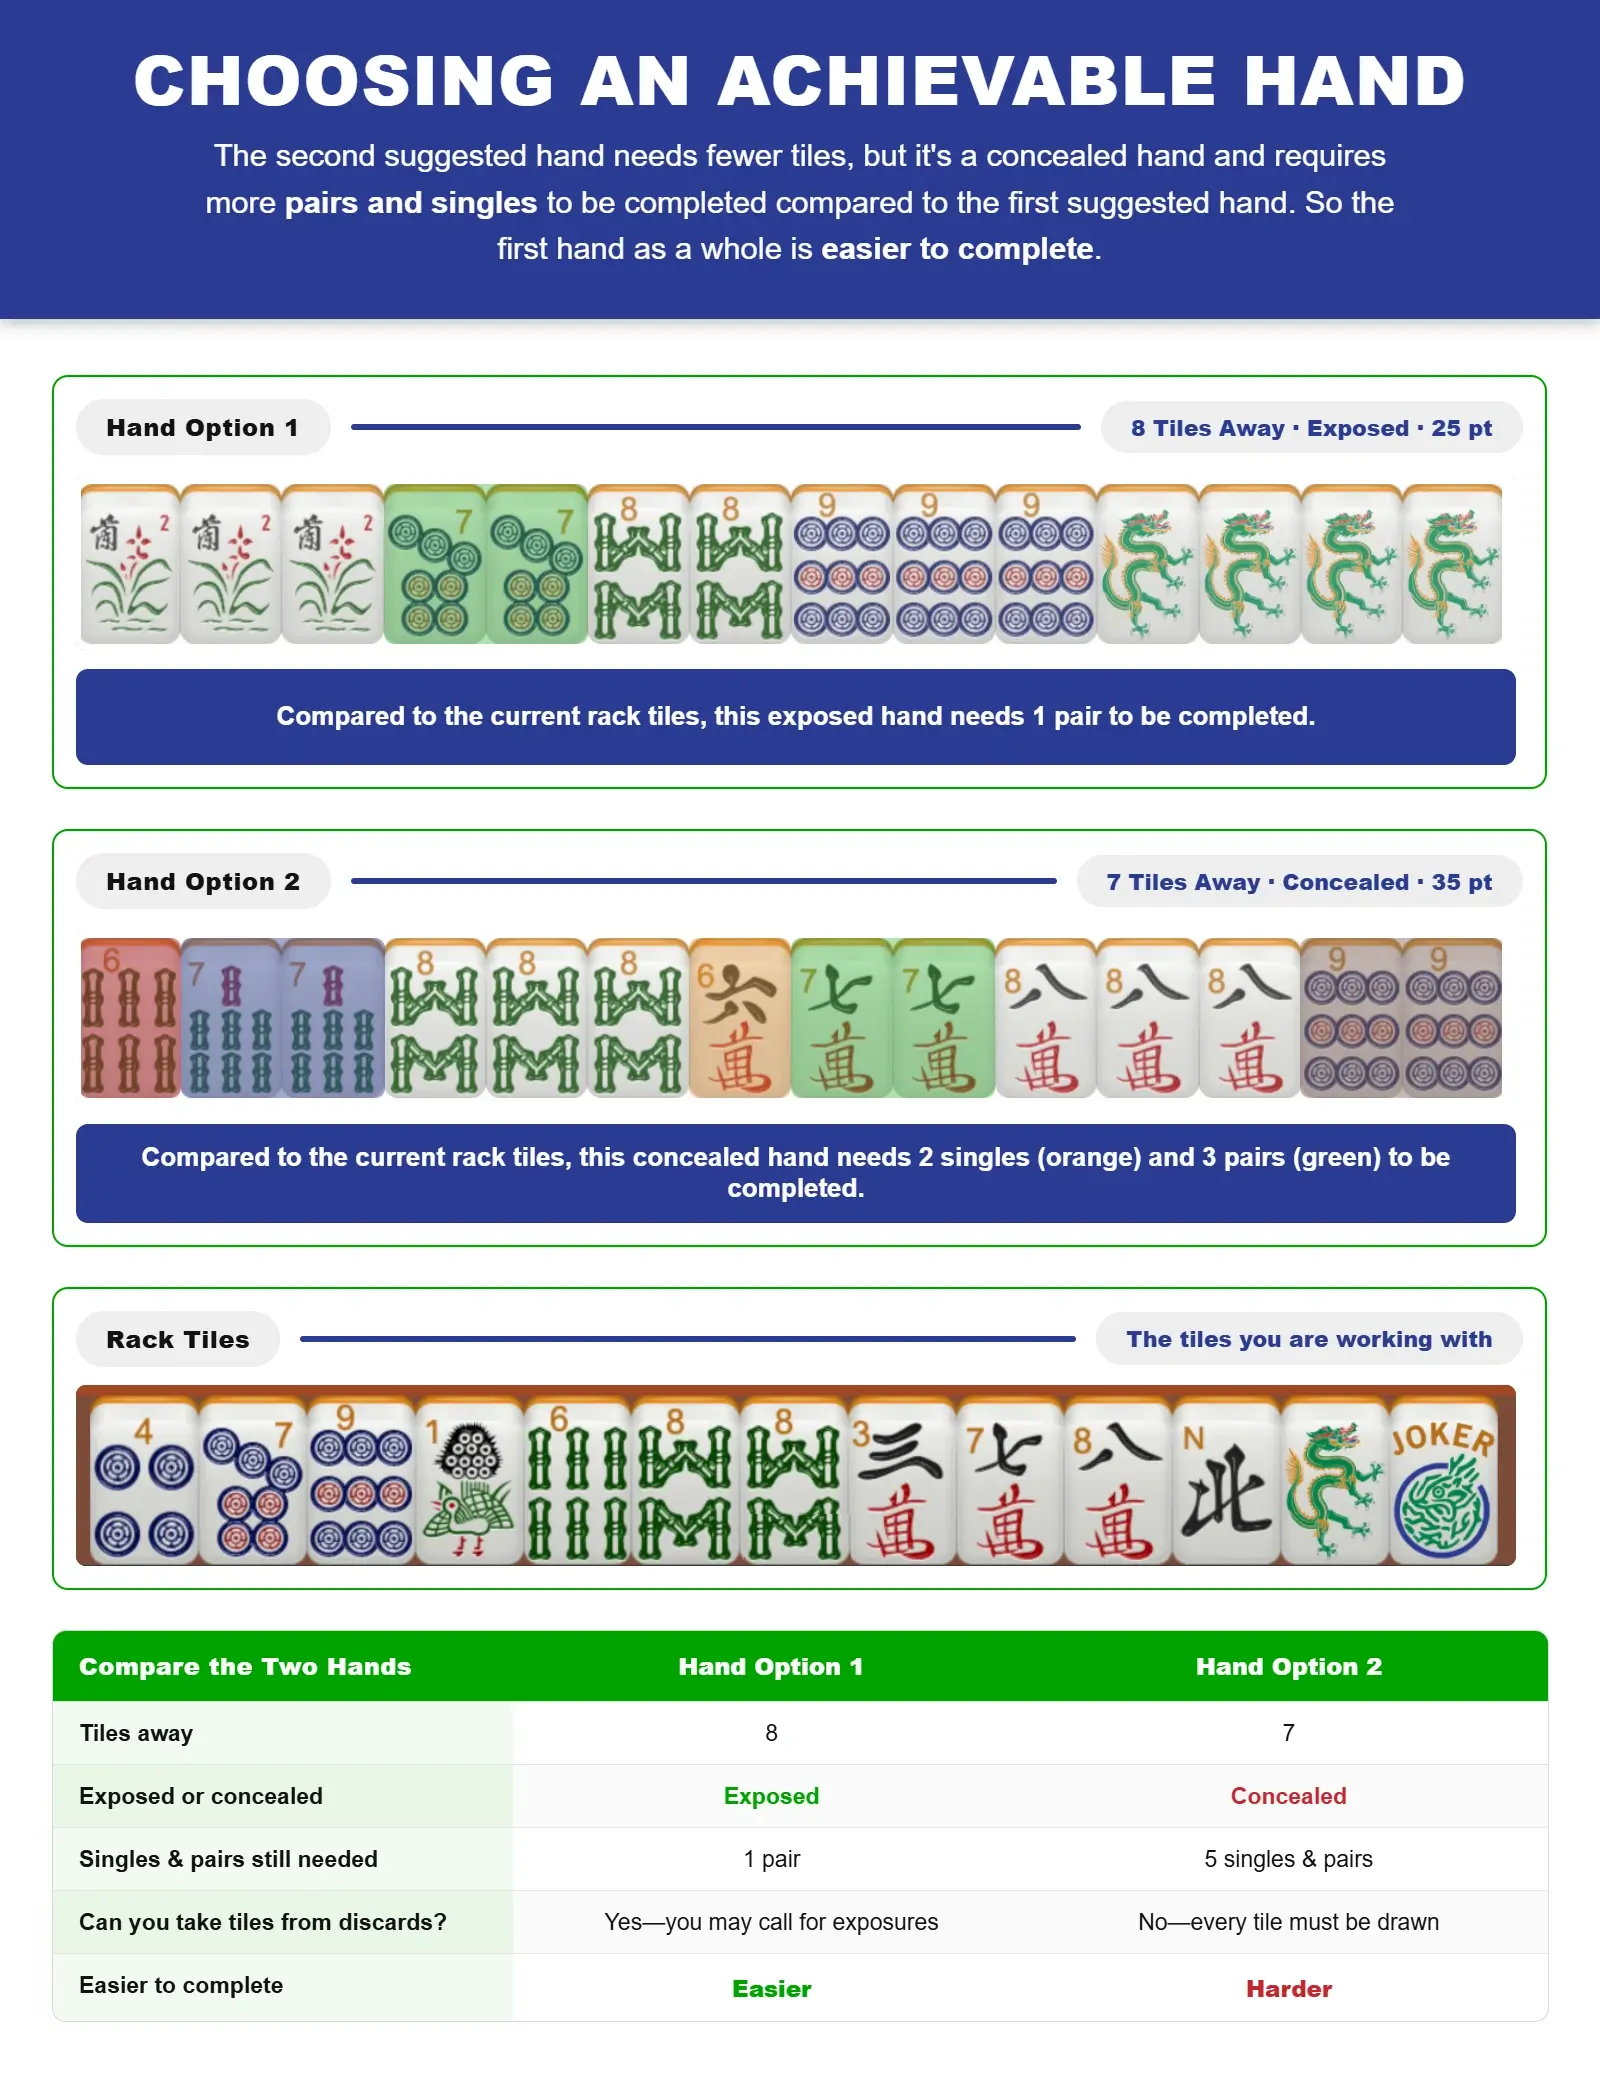
While choosing a hand that requires the fewest tiles is a useful starting point, you need to weigh how difficult the missing tiles will be to obtain. A Mah Jongg hand that requires five tiles to resolve singles or pairs may be harder to complete than one that needs eight tiles to resolve pungs and kongs, which can be completed with by using Jokers or calling discards. And a concealed hand that requires fewer tiles may be less achievable than an exposed one because you have to rely on the Charleston and whatever you draw to complete a concealed hand.
So before you begin the Charleston, determine which option offers the fewest roadblocks to becoming a winning Mah Jongg hand. Consider how many singles and pairs are currently unresolved and whether the hand is concealed or exposed. During the Charleston, not only try to strengthen your hand, but gather clues from the tiles being exchanged. Consider which tiles seem undesirable to other players, which means they may be easy to pick up as discards.
Use the table below to help decipher which options are most achievable, but give yourself room to pivot throughout the game by weighing your options against the clues you’ve seen, from Charleston patterns to discards and exposures.
| Factor | More Achievable | Less Achievable |
|---|---|---|
| Required singles and pairs | You already have most or all of them. | You still need to acquire several. |
| Joker use | Most missing tiles belong to pungs, kongs, or quints. | Most missing tiles cannot be replaced by Jokers. |
| Calling opportunities | You can call discards for several missing groups. | The hand must remain concealed or rely on singles and pairs. |
| Charleston pattern | Tiles you need continue circulating or return in later passes. | Tiles you need do not appear or seem to be retained by other players. |
| Charleston length | Additional passes plus a courtesy pass give a developing hand more opportunities to improve. | The Charleston ends after three passes, giving fewer chances to strengthen your hand and a signal that an opponent already has a strong hand. |
2. Make a Purposeful Decision for the Second Charleston
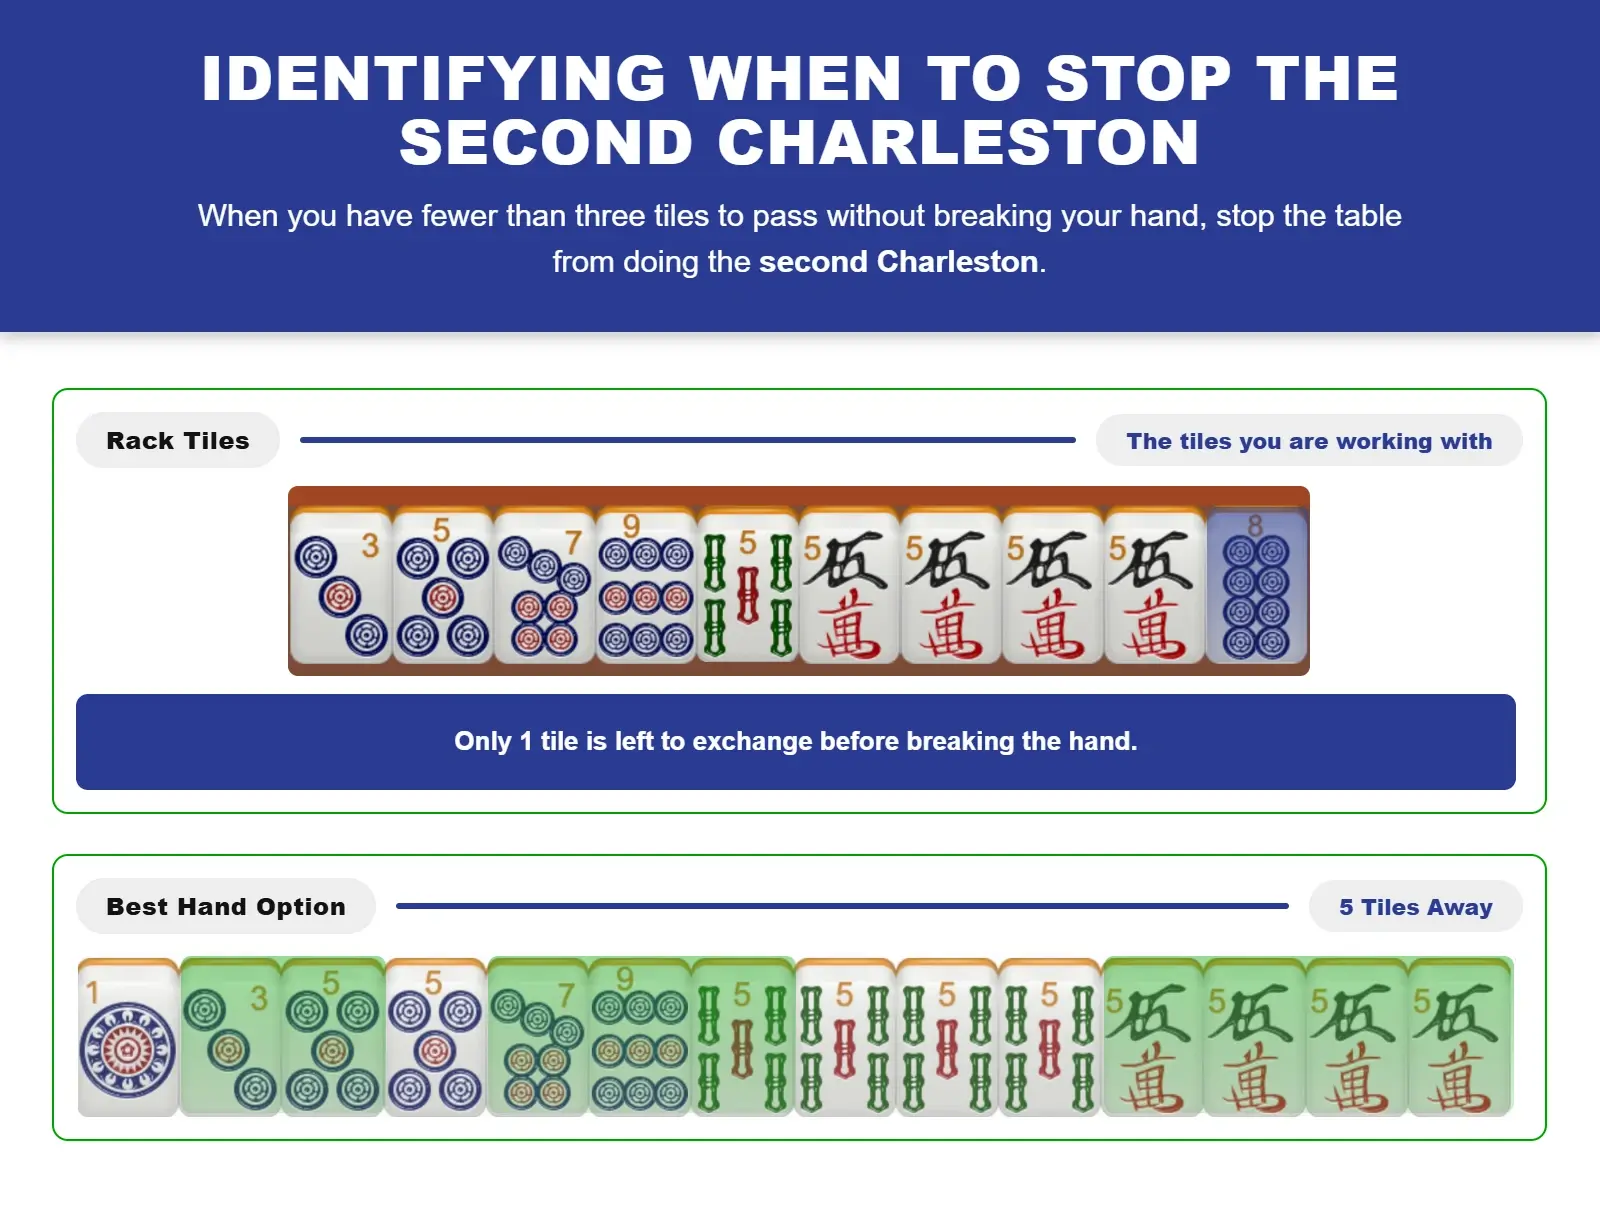
Before agreeing to a second Charleston, count how many tiles you can pass without weakening your target hand or a realistic backup option. Automatically continuing or stopping after the first Charleston overlooks an important strategic decision. Three more passes can strengthen a developing hand. But if you’re not prepared to give away useful racked tiles from a strong hand, the second Charleston is a waste of your time that gives your opponents the advantage of strengthening their hands.
Continue when you have at least three clear discards or still need the additional passes to establish a direction. Consider stopping when nearly every tile supports one or two achievable hands, especially when further passing would require breaking a pair or giving away another difficult-to-replace tile.
| Your Rack After the First Charleston | Better Option | Why |
|---|---|---|
| Contains at least three clear discards | Continue | You can receive up to nine new tiles without immediately weakening your hand. |
| Still supports too many incomplete possibilities | Continue | More passes may reveal which pattern is actually strengthening. |
| Has no clear direction | Continue | Additional tiles may create a workable hand or section. |
| Strongly supports one hand with few expendable tiles | Consider stopping | Further passes may force you to dismantle useful groups. |
| Supports two closely related hands but has fewer than three safe passes | Consider stopping | You can preserve flexibility without sacrificing crucial tiles. |
| Would require breaking an unresolved pair | Consider stopping | Pairs are difficult to rebuild because Jokers cannot replace them. |
3. Budget Your Picks Using Mah Jongg Wall Math
Unlike tracking tile availability, which asks whether the tiles you need could still be in play, wall math asks whether you have enough opportunities left to draw them. A hand may be achievable based on its missing tiles but run out of time to complete because the wall is diminishing. So use math to consider how viable your hand remains. American Mah Jongg begins with 152 tiles, 53 of which are dealt to the four players, leaving 99 in the wall. Dividing the tiles remaining in the wall by four provides a rough estimate of how many more draws you may receive.
Compare your estimated draws with the number and type of tiles your hand still needs. A hand that is several tiles away may remain viable with 15 draws left but become unrealistic with 4. As your draw budget shrinks, your risk increases. So make more risk-averse decisions, such as
- Prioritize calls that secure crucial tiles.
- Avoid a late change of hand that requires rebuilding.
- Prepare to enter defensive mode when your remaining picks no longer provide a reasonable path to Mah Jongg.
Because calls can skip players and alter the turn order, use the calculation as a decision-making estimate rather than an exact prediction. Because Mahjong 4 Friends tracks the wall count, you can use that plus this table to make better decisions and enhance your mid-game as well as end-game strategies.
| Tiles Remaining in the Wall | Approximate Picks per Player | What It Means for Your Hand |
|---|---|---|
| 80 | 20 | There is still time for a developing hand to improve. |
| 60 | 15 | Reevaluate unresolved singles, pairs, and other bottlenecks. |
| 40 | 10 | Commit to the strongest option and consider calling crucial tiles. |
| 24 | 6 | A hand needing several specific draws may be running out of time. |
| 16 | 4 | Continue offensively only if the hand is close and the needed tiles remain possible. |
| 8 | 2 | Unless you are ready for Mah Jongg, prioritize safe discards and defensive play. |
4. Identify and Manage “Hot” Tiles Early
While holding every potentially useful tile is not practical, waiting too long to discard one can give an opponent time to prep their hand and call it. A tile becomes “hot” (risky to discard) if an opponent may be able to use it. The challenge is that a tile’s risk changes throughout the game. A tile that is relatively safe during early gameplay may become dangerous after exposures reveal a likely hand or opponents have enough tiles to call a discard.
Use information from the Charleston, player discards, exposures, and the remaining wall to judge when a tile is becoming too risky to discard. If a tile doesn’t support your hand or backup option, consider releasing it early, before opponents have enough tiles or Jokers to call it. As the game progresses, require more evidence that a discard is safe. For example, after a player has made two compatible exposures or the last wall is in play, avoid discarding a tile that fits the player’s likely remaining groups if you can. This table can help you sort through the clues.
| What You Observe | Risk Level | How to Respond |
|---|---|---|
| A tile type does not appear during the Charleston. | Possible early demand | Keep it in mind, but do not treat the Charleston alone as proof. |
| An opponent avoids discarding a particular suit, number group, or Wind or Dragon tile. | Possible connection to the player’s hand | Compare the pattern with other clues. |
| One exposure reveals that certain hands could use the tile. | Moderate risk | Check the NMJL card for all hands that fit the exposure. |
| An exposure and the player’s discards point toward the same hand. | High risk | Hold tiles you suspect help their hand and watch for a second exposure to confirm the direction. |
| Two exposures narrow the possibilities to one or two hands. | Very high risk | Avoid discarding tiles that complete the likely remaining groups. |
| A third exposure reveals the probable final grouping. | Extreme risk | Avoid discarding the tile. |
| The last wall is in play and the tile has not appeared. | Elevated endgame risk | Do not introduce it unless you are confident it cannot give another player Mah Jongg. |
5. Weigh the Information Cost of Making Exposures
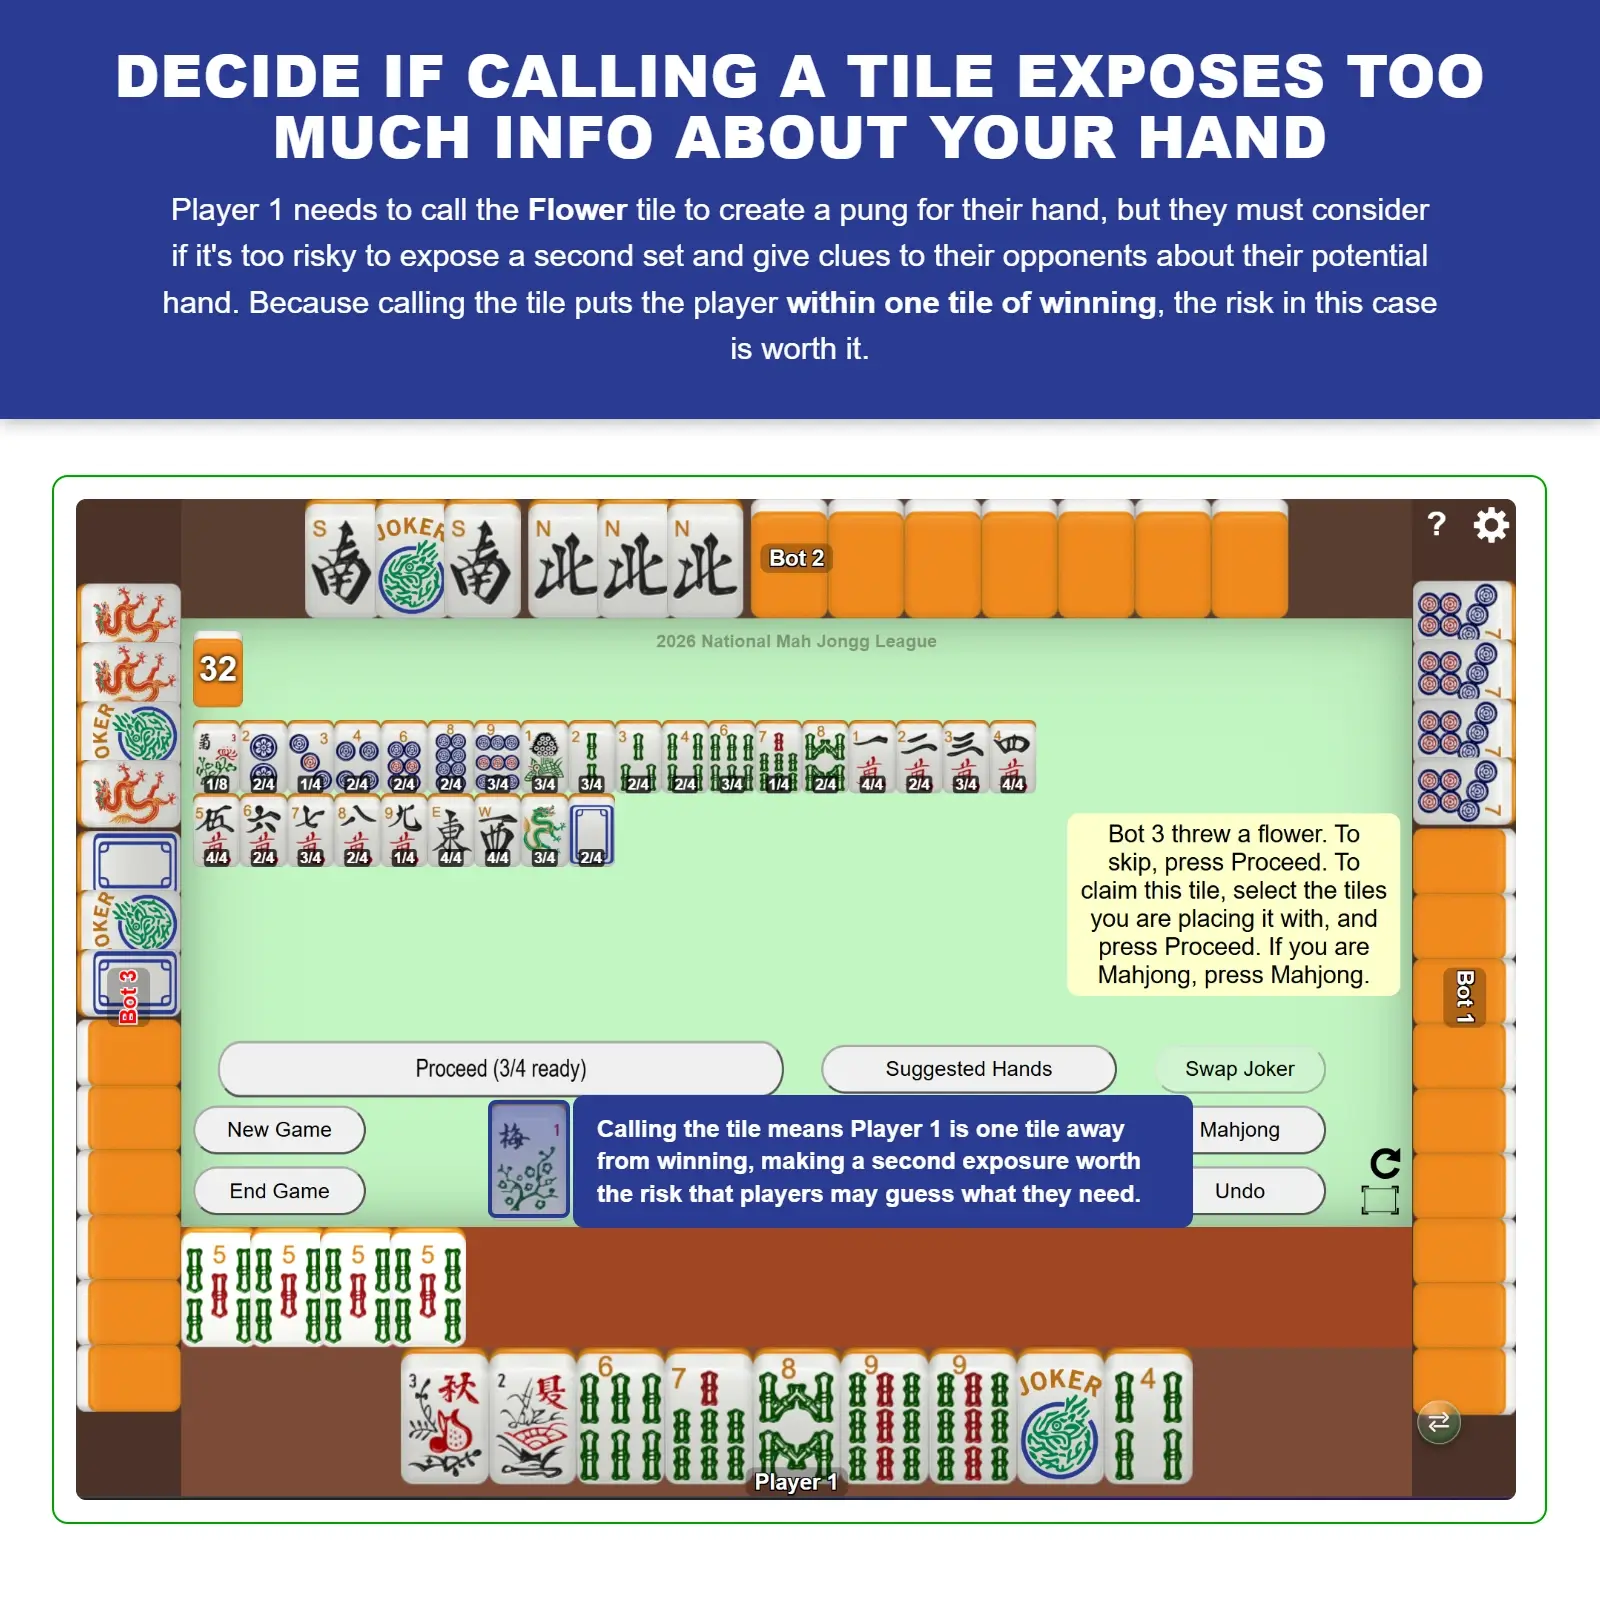
Consider whether it’s worth making an exposure, which reveals info to other players about your hand, by figuring how easily you can complete that pung, kong, or quint later in the game. Calling a discarded tile can move your hand forward, but the resulting exposure also gives opponents information. After they identify the hand you’re targeting, they can stop discarding your crucial tiles and may hold them through the end of the game.
Before calling, compare the value of securing the tile with the information you will reveal. A versatile exposure that fits several hands or sections keeps opponents guessing, but an exposure that confirms what hand you’re targeting is risky. Timing matters too: An early exposure gives opponents more time to defend, while a second or third exposure can highlight for other players the exact hand you’re trying to complete. However, calling may still be worthwhile when the tile is difficult to replace, completes a group without using a Joker, or moves you close to Mah Jongg.
| If the Exposure . . . | Information Cost | What to Consider |
|---|---|---|
| Fits several hands or sections | Lower | If calling may preserve flexibility without revealing your exact hand |
| Fits only one or two hands | Higher | Whether securing the tile is worth making your direction clear |
| Includes a distinctive Wind, Dragon, or Flower grouping | Higher | If opponents will be able to identify your hand immediately |
| Is your first exposure late in the game | Lower | How much/little time opponents have to use the information defensively |
| Would be your second exposure | High | That the combination of exposures may identify your exact hand |
| Completes a difficult Jokerless group | Potentially worth the cost | If the value of securing the tile outweighs the information revealed |
6. Exchange Exposed Jokers Even If You Don’t Need Them
Making a Joker swap when you can’t use the Joker shields those high-value tiles from opponents and gives you a guaranteed-safe discard. An exposed Joker can be worth exchanging even when it doesn’t immediately improve your hand. Taking it prevents another player from making the exchange, you may have a change of hand that requires the Joker, and it gives you a completely safe discard if you ultimately can’t use it. Because a discarded Joker cannot be called, it can be especially valuable when hot tiles are becoming difficult to release.
Make the exchange only when the natural tile is expendable. Don’t give up a tile that supports your hand or plan B simply to acquire a Joker you can’t currently use. Also consider whether replacing the Joker will leave the opponent with a jokerless hand and increase its value under Mah Jongg scoring rules. The strategic benefit of denying the Joker to the rest of the table must outweigh both that possibility and the value of the natural tile in your own rack.
| Situation | Exchange Value | Explanation |
|---|---|---|
| The natural tile is crucial to your hand. | Low | The exchange would reduce your own chance of winning. |
| Your current hand needs only singles or pairs. | Moderate | The Joker can’t complete those requirements but remains a safe discard. |
| You have unfinished pungs, kongs, or quints. | High | The Joker may immediately solve another part of your hand. |
| The natural tile doesn’t support any of your hand options. | High | You gain a flexible tile without weakening your hand. |
| Hot tiles are becoming difficult to discard. | High | The Joker gives you a discard no opponent can call. |
| Another player may hold the natural exchange tile. | Higher urgency | Waiting may allow that player to exchange the Joker first. |
7. Turn Unwanted Pairs into Joker Bait
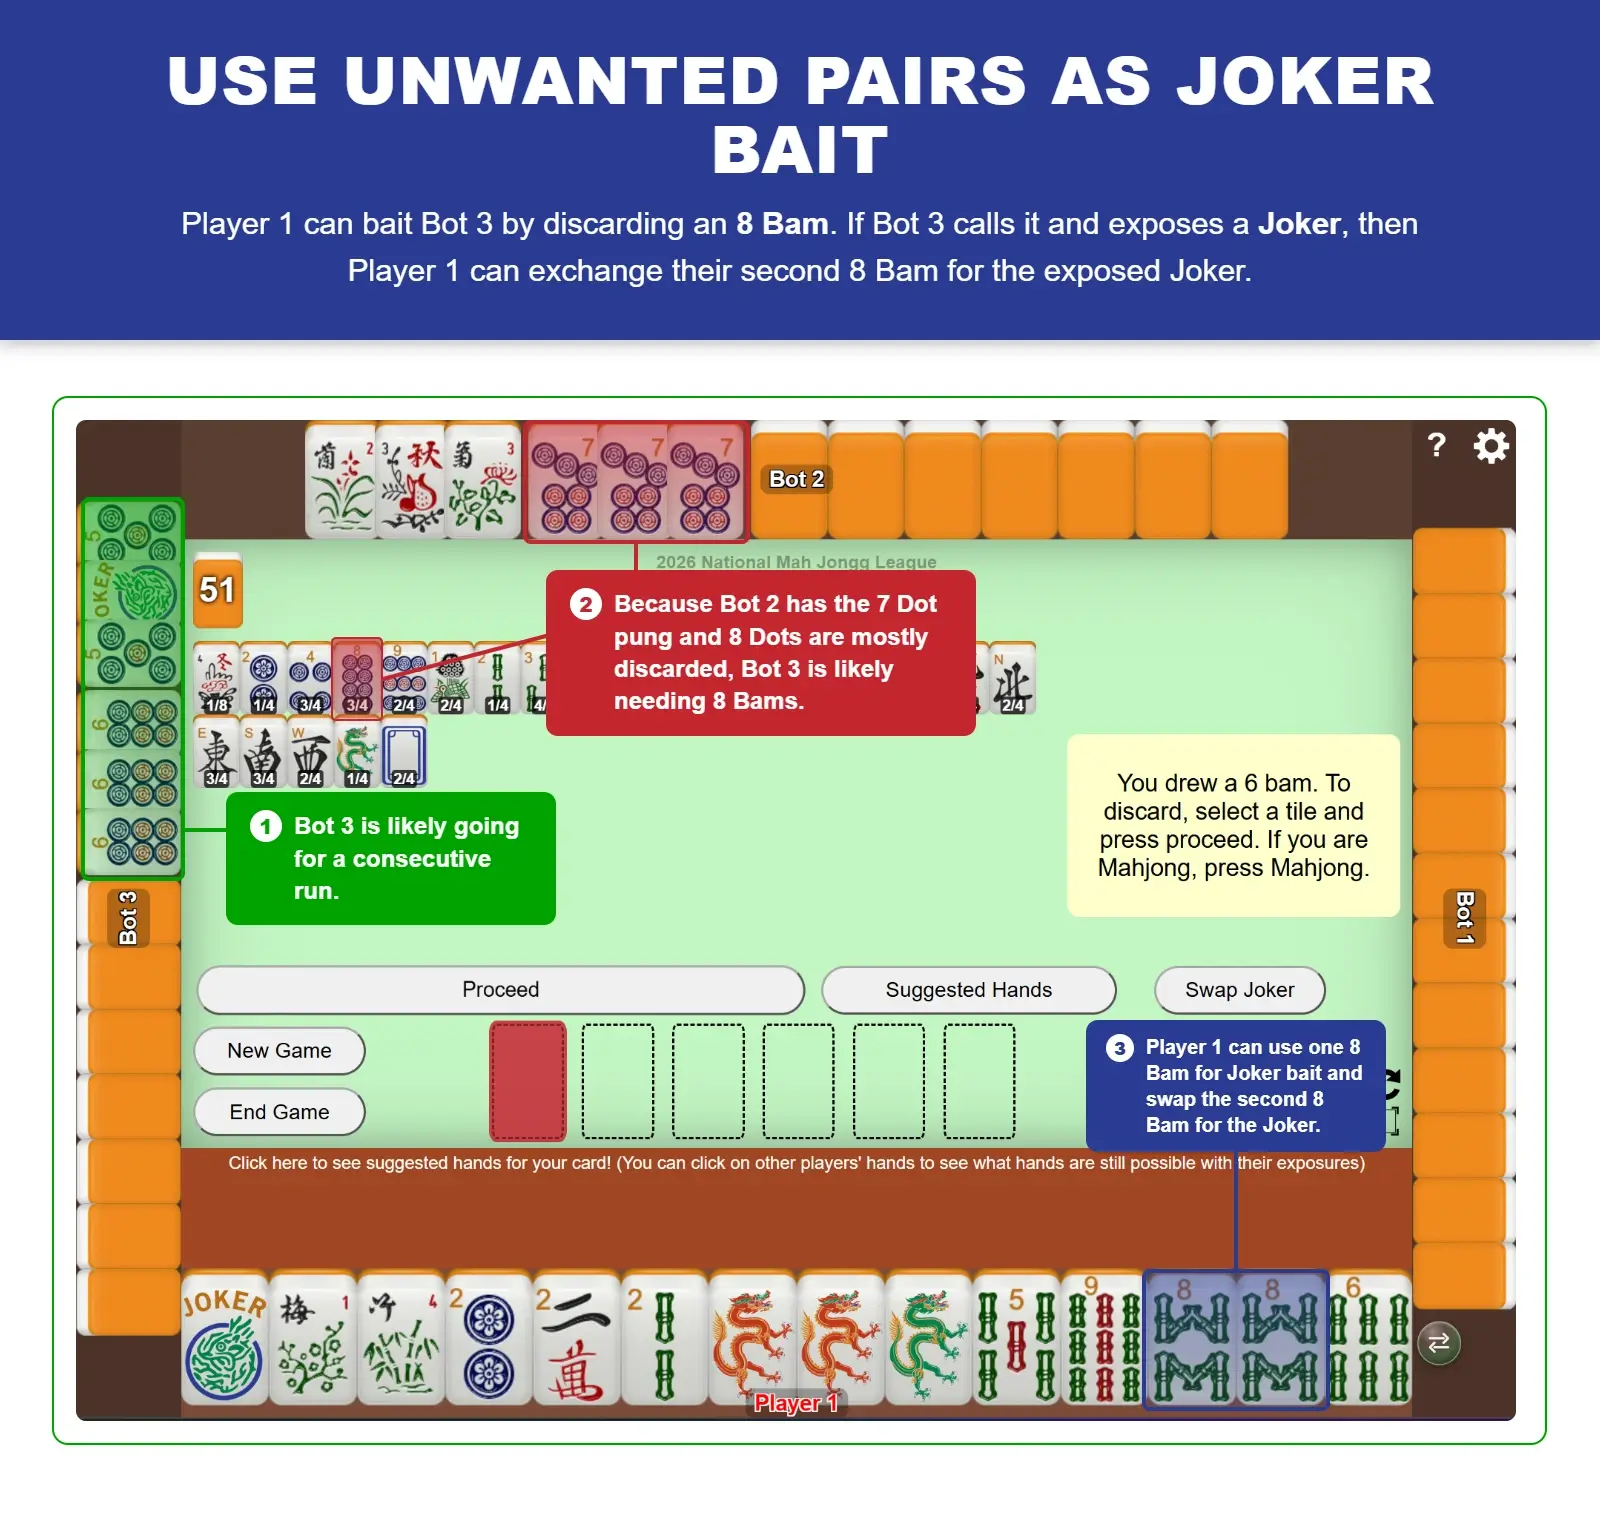
Hold pairs of tiles you don’t need but suspect others might. With Joker bait, you hold that pair of tiles until players are more likely to call, then discard one tile with the hope that an opponent uses it to make an exposure containing a Joker. If the Joker remains exposed when your turn arrives, you can exchange the second tile for it, according to Mah Jongg Joker rules.
This Joker strategy works well at mid-game, when opponents have begun committing to hands but the discarded tile is not yet likely to give someone Mah Jongg. By this time, you will have had the chance to get a sense of what opponents are discarding and thus what they need. So when you draw a tile that matches one in your rack that you haven’t seen discarded or that you suspect belongs in someone’s hand, keep it. Then use it when you think the timing is right.
This mid-game strategy largely depends on reading your opponents, their discards, and the board. The strategy is less attractive the longer the game goes on because the tile could be the last one they need. This table can help guide you through factors to consider.
| Situation | Joker Bait Potential | Explanation |
|---|---|---|
| The tile could complete an opponent’s hand. | Too risky | If it’s later in the game with several exposures, try to hold the pair if you suspect the tiles are needed. |
| The game is still in its early turns. | Weaker | Players may not be ready to expose a group. |
| An opponent can expose the group without a Joker. | Weaker | This is a chance you take anytime you use the strategy, but you should have a good read with discards and table clues. |
| The pair doesn’t support your hand or backup option. | Stronger | If you’re not sure that an opponent needs the tile, it’s still worth discarding to test it out. |
| An opponent appears to need a pung or kong of that tile | Stronger | Based on how you read the opponent and the discards, try baiting by discarding the tile. |
8. Treat a Discarded Joker as an Endgame Signal
When a Joker is discarded, reconsider the player’s exposures, previous discards, and likely hands on the NMJL card. Because Jokers can substitute for tiles in pungs, kongs, and quints, players rarely discard them while those groups remain incomplete. A discarded Joker may indicate that the player’s remaining needs can’t be filled by one—often because the player is waiting for a single, completing a pair, or has already finished every Joker-eligible group. It can also mean the player has abandoned the hand and entered defensive mode, so the discard is an important signal rather than proof that Mah Jongg is close.
To determine where the player stands after discarding a Joker, use the table as you check for clues that point to what hand they’re targeting. If you can determine the hand, identify the required singles or pairs and avoid discarding them. If the hand appears impossible, the Joker may instead confirm that the player is defending. The signal becomes more urgent near the last wall, when fewer alternative explanations remain.
| What Accompanies the Joker Discard | What It May Indicate | How to Respond |
|---|---|---|
| Several completed exposures | The player may be waiting for a final single or pair. | Identify the remaining requirements and protect those tiles. |
| An identifiable hand with all large groups completed | A Joker can no longer improve the hand. | Assume the player may be close to Mah Jongg. |
| A concealed rack with no exposures | The player may be pursuing a singles-and-pairs hand. | Use previous discards for additional clues before drawing a conclusion. |
| Crucial tiles for the player’s apparent hand are already unavailable | The hand may be dead. | Expect defensive discards rather than an imminent win. |
| The last wall is in play | The player may be protecting the table or waiting for one natural tile. | Become more conservative with previously unseen tiles. |
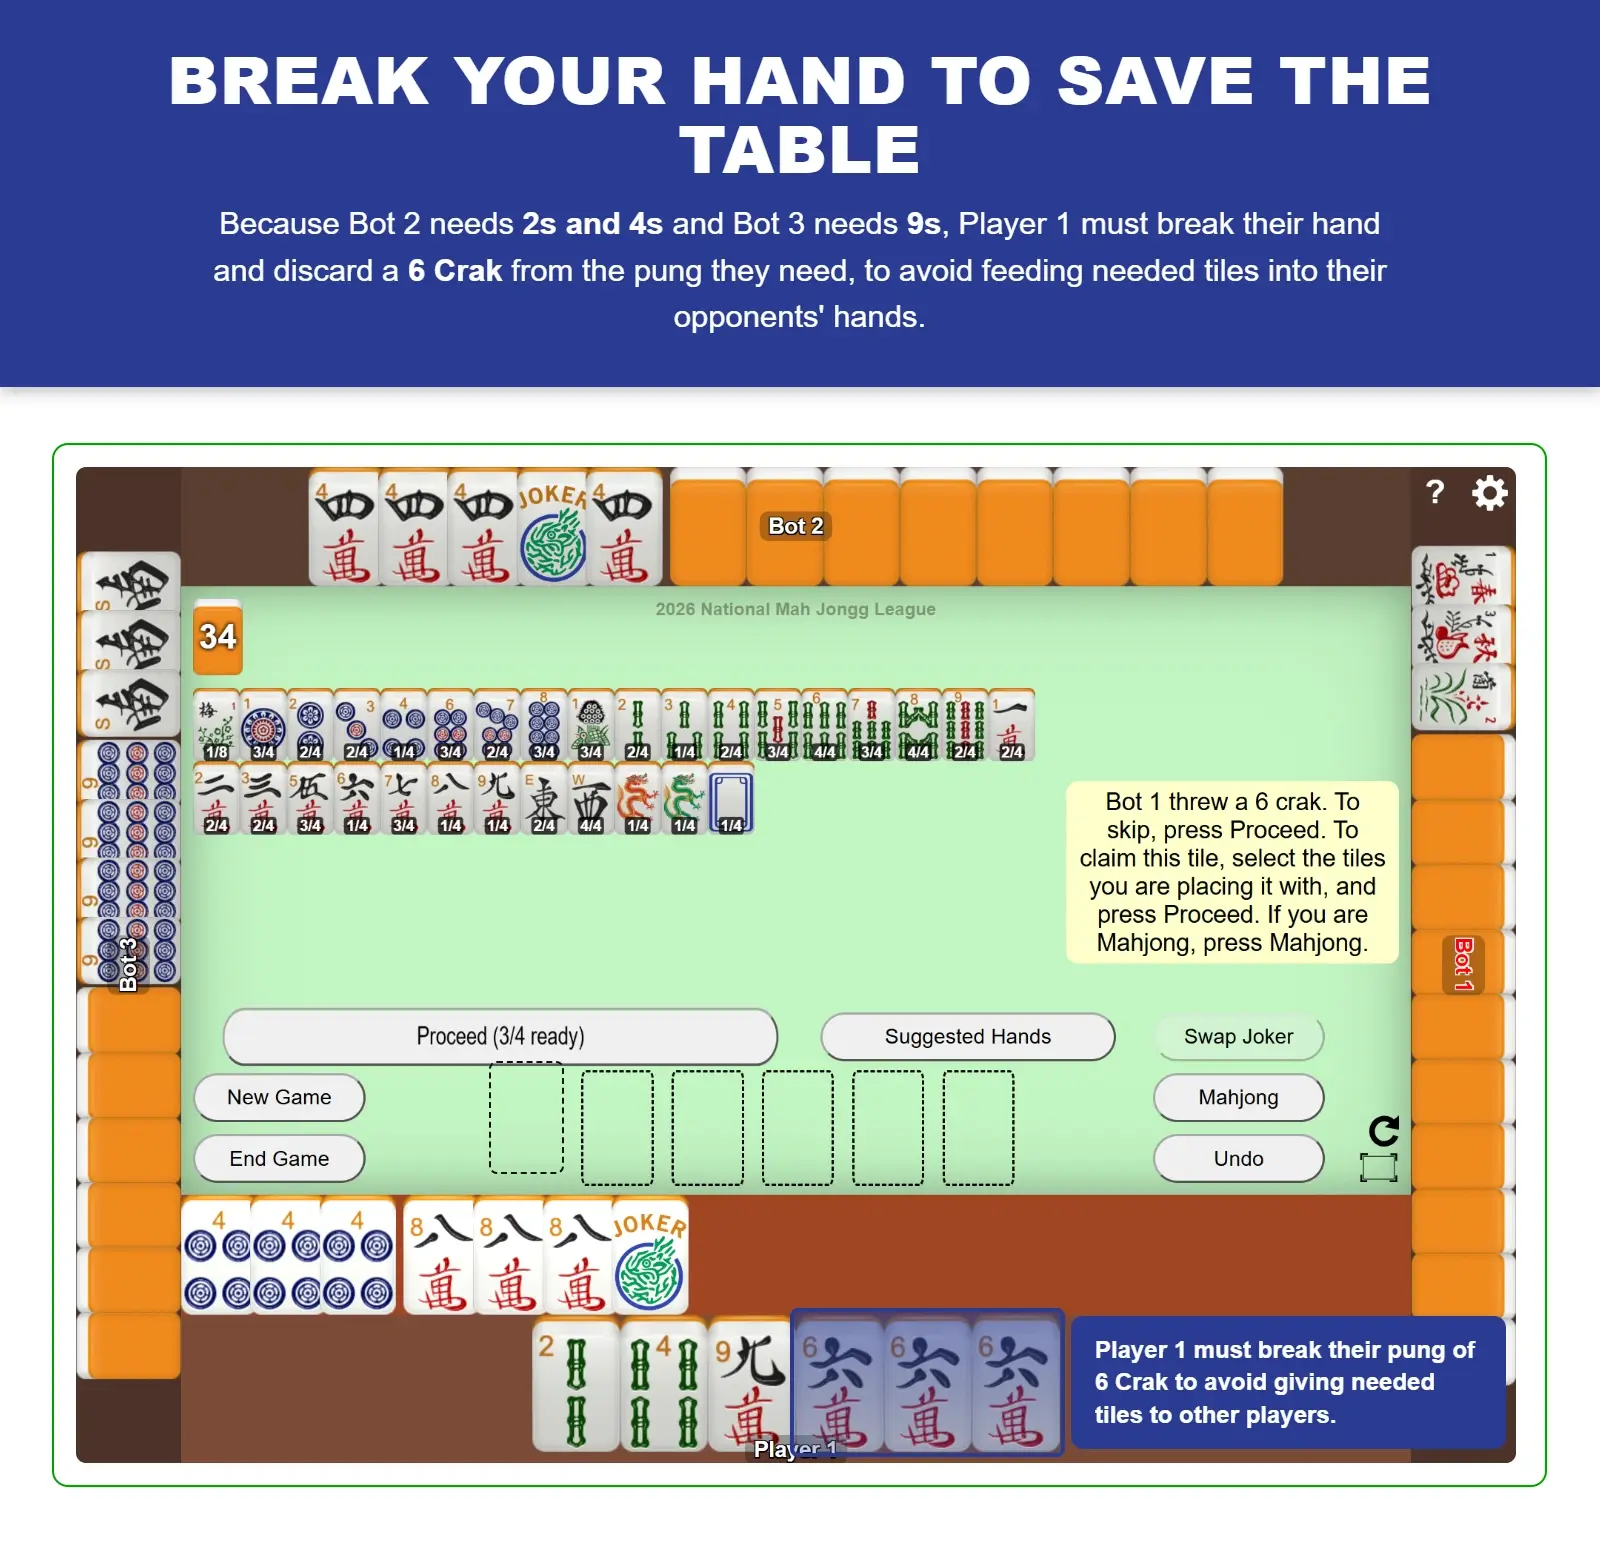
9. Know When to Break Your Hand to Play Defense
If an opponent appears close to Mah Jongg and your own hand still needs several tiles, protecting the table may offer a better outcome than preserving a small chance of winning. This decision becomes especially important after a player makes a second or third exposure, when the remaining groups in that hand may be easier to identify.
Especially if you’re keeping score, another player that wins with your discard can cost you more points. So before discarding, compare your remaining draw budget with the opponent’s apparent progress. Continuing to build your hand isn’t always the strongest move. If the opponent is likely one group or pair away while you still need several specific tiles, enter defensive mode and hold anything that could complete your opponent’s hand. Break one of your own pungs, kongs, or other useful combinations if it gives you a safer discard.
The goal is not to abandon every promising hand at the first sign of danger, but to recognize when the risk of feeding Mah Jongg outweighs your realistic chance of completing your own hand.
| Game Situation | Offensive or Defensive Response |
|---|---|
| An opponent has one exposure and your hand is progressing. | Continue building while watching for additional clues. |
| An opponent has two exposures that identify one or two likely hands. | Begin holding tiles that fit the remaining groups. |
| An opponent has three exposures. | Determine the likely concealed group before discarding. |
| Your hand is one tile away and safe discards remain. | Continue offensively. |
| Your hand still needs several specific tiles and the wall is short. | Shift toward defensive play. |
| Every loose tile may help an opponent. | Break a completed or developing group to create a safer discard. |
Put Advanced Mah Jongg Strategies into Practice
Advanced Mah Jongg play is less about following fixed rules and more about interpreting how the game changes. Charleston patterns can help you choose an achievable hand, but later discards and exposures may change the value or risk of individual tiles. A call that speeds up your hand may also reveal it, while a Joker that doesn’t help you offensively may still provide a defensive advantage.
As you practice these strategies, focus on one or two at a time. Compare the true difficulty of your possible hands, notice when an ordinary discard becomes a hot tile, or pause before making an exposure to consider what it will tell your opponents. Over time, these individual decisions will become part of a larger skill. You can play and practice these strategies anytime for free on Mahjong 4 Friends.